Showing posts with label tutorial. Show all posts

Monday, July 14, 2014

Faux Canvas with Textured Cardstock

Today's project is a faux canvas - and I'm going to show you how I created it.  I've found that sometimes if you add much media to a scrapbook layout, the page warps or curls - so this simple trick not only gives you more of a canvas look, it also solves this pesky problem.


1.  Begin with a textured cardstock (WorldWin ColorMates Textured Denim - Aqua Denim).  Use a household sponge to brush on a thin layer of gesso.


2.  Run a piece of 12 x 12 chipboard (WorldWin Heavy Chipboard) through the Xyron Creatopia to apply an edge to edge layer of adhesive.


3.  Carefully line up the edges, and  lay the cardstock  down on the chipboard.

4.  Stamp background images (Creative Embellishments) using watermark ink, and heat emboss with white powder.


5.  Arrange the elements of the layout as desired, using the Xyron/Teresa Collins foam adhesives when dimension is needed.

6. Use the Xyron Double Sided Tape to adhere the ribbon elements.

7.  Cut 3 chevrons from the printed paper ( Simple Stories - Hello Baby) Score the center of each.


8.  Use a scrap piece of plastic cross stitch canvas as a guide to pierce evenly spaced holes for stitching.
9.  Use twine to handstitch the chevrons.  Cut a plain cardstock chevron, and apply adhesive using the Xyron 5" Creative Station.  Place this on the backside of the chevrons, for a place for hidden journaling.
10.  Use double sided tape, down the spine of the chevrons to add to the layout.

11.  Fussy cut the title from the patterned paper, ink the edges and use foam adhesives to apply.

12.  Paint over the May Arts Sequin Heart with gesso to tone down the color and add to the center border.
I hope you have enjoyed my project - and remember to check out the rest of the inspiration this week!

Supplies:
 WorldWin Papers
Xyron:
May Arts Ribbon
Simple Stories
Zva Creative
CR-05CA-133
Creative Embellishments

Monday, June 30, 2014

Wishing You Everything Happy


Hi, it's Gini and today I have a card to share with you that really shows off our ColorMates Smooth and Silky line.  This paper is just as it's name implies , and it is the perfect choice for so many paper crafting techniques. On my card today, I've shown you how beautifully it works for die cuts, embossing, stamping and flower making. This is truly a go-to cardstock.


So here is how I created my card.

1. Cut a card base 5" x 7" using the Natural cardstock.
2.   Cut a piece of the Beach cardstock 1/4" smaller and emboss using the M-Bossabilities folder.  Ink over the raised areas with Desert Sand ink.
3.  Cut a piece of cardstock in Sage 1 1/2" x 4 3/4".  Adhere satin ribbon to the middle.
3.  Line the edges of the last piece using the pearl strips.
4.  Die cut a border using the Moroccan Accents and adhere to the back of the ribboned panel. Adhere to the card.
5.  Stamp the decorative label using watermark ink and heat emboss with clear powder. Cut out the label.
6.  Stamp the sentiment with Chocolate ink. Use foam adhesives to apply to the card as shown.
7.  Die cut flowers, mist with Sandcastle Colorations and shape by pleating while damp.  Assemble the flower, add a large pearl for the center.
8.  Cut strips of ribbon with fish tail ends, and glue to the back of the flower.  Adhere the flower to the card.
9.  Cut the decorative flourishes and tuck behind the flower.
10. Finish with a corner pearl flourish.


Supplies
Zva Creative:
Flourish PE-02CB-132
Pearl Lines PE-02CB-107
Large Pearls CRW-05CA-176
JustRite Stamps - Birthday Vintage Labels Four
May Arts Ribbon - HA-78-02
Spellbinders Dies - Moroccan Accents; Arianna Lace, Arianna Blooms
Art Anthology Colorations - Sandcastle
Spellbinders M-Boassabilites - Decorative Fancy Tags Two


Thursday, April 24, 2014

Building Block Card Tutorial

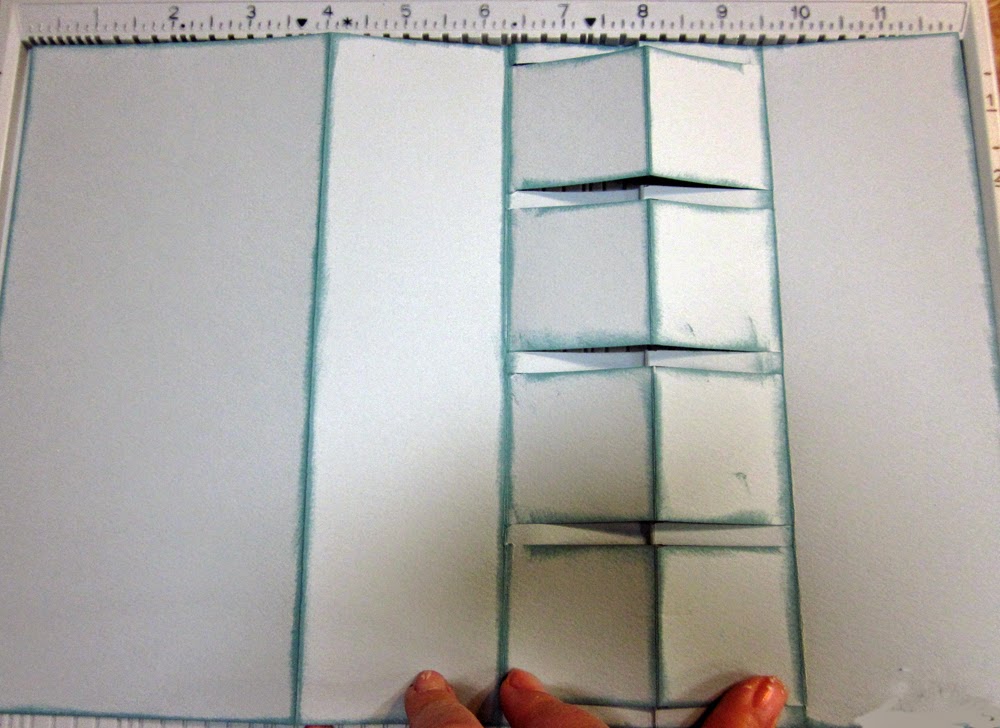
It's always fun to try different fancy fold cards - and I had not ever tried this one...  I have adapted a tutorial for a Building Block Card and changed the dimensions to accommodate the size of my  stenciled letters.  My version makes a tall and skinny card.


1.  Cut a piece of cardstock 8 1/4" x 12".  With the long side against the top of the scoring board, score at 4" (mountain fold) and 8" (valley fold).


2.  Pull the valley fold up like a mountain fold, and cut 1 3/4" in at the following intervals:
       1/4"
      2"
      2 1/4"
      4"
      4 1/4"
      6"
      6 1/4"
      8"
      8 1/4"


3.  Add a score line to the ends of each of the wide blocks ( at the 6 1/4" and 9 1/2") and fold as shown.  Ink the edges of all of the folds.


4.    Use a spatula to spread the Teresa Collins Basically Essential Modeling Paste over the letters from the Basically Essential Stencil to spell your sentiment.   Allow to dry and cut out the letters.
 5.  Decorate the panels with patterned paper.  Use the Xyron 5" Creative Station to apply adhesive to the panels.
Hint:  If you accidentally get adhesive in the wrong place, use the Xyron Adhesive Eraser Cube to remove the boo boo.

 6.  Cut letters from the patterned paper, ink the edges and apply adhesive using the Xyron Mini Sticker Maker.
 7.  Add ribbon to the card using the Xyron 1/4" Double Sided High Tack Tape.

 8.  Die cut flowers - cut two of the largest flowers from WorldWin's CutMates Spring Water paper.  Cut the next two sizes using the WorldWin Translucent Vellum White Plaid.  Ink the edges and shape.  Add a Zva Creative Mini rose to the center of the flower. Assemble  using the Xyron/Teresa Collins Clear Hold Adhesive. 


9.  Cut panels for the back of the card (for a place to write your message) using WorldWin Beargrass Petallics Cardstock.  Ink the edges and adhere using the Xryon 5" Creative Station.


10.  Finish assembling the card as shown.


Xyron 5" Creative Station
Xyron/Teresa Collins Adhesive Kit
(Products from this kit that were used were -Foam Squares, Adhesive Eraser Cube, 1" Sticker Maker, High Tack Double Sided Tape, Clear Hold Adhesive)
CTMH Ink

Wednesday, February 26, 2014

CAS Butterfly Card Tutorial


 Hi!  Most of you know that I don't do clean and simple cards very often - but sometimes and idea hits and you just have to go with it.  So although it's a simple design, I'd love to share with you how I created it.

1.  Tape the Dreamwever Stencil (Daisy Background LX7014) to WorldWin's ColorMates Light Ocean Blue Cardstock.  I used the old school method to emboss this with a light box and stylus (stencil is on the underside).

2.  After embossing, use Viva Decor Metallic 3D Stamp Paint to add some glittery highlights to the flower centers.


3.  Rub turquoise ink over the entire stenciled area.

4.  Spray with Lindy's Stamp Gang - Opal Sea Oats.  Use this background paper to die- cut a butterfly from the Spellbinder's Wings of Hope set.


 5.  Cut a piece of ColorMates Heritage White 7" x 4".  Score at 1"

6.  Cut a piece of 29 lb.Translucent  Vellum 6" x 4".  Use Xyron Double Sided Tape to adhere to the inside of the short flap of cardstock.  The vellum should line up straight with the cardstock to complete the card base.

7.  Stamp matching Unity Fly With Wings of Hope butterfly, using Versamark ink and heat emboss with LSG Silver Moon Turquoise.  Shape the die cut butterfly and adhere slightly above the stamped "shadow".  Stamp the sentiment and heat emboss with black powder.


Friday, February 7, 2014

Background Stamping


 I've got a card to share with you today- and it all started with a cool background stamp.  I decided to make some paper blooms to correspond with some of the stamped  images.  I also added some fun mixed media techniques - so I've got a tutorial to share with you, how I created this piece.


Start with WorldWin Papers new Parchment paper.  This already created some texture and depth.  
Use a mask and spray Art Anthology's Fern Leaf Colorations.

Position the mask to spray the un-inked areas with the Guacamole Colorations.

 Outline around some of the diamonds using a gold Sharpie marker.

Stamp the French Rose background stamp with watermark ink and heat emboss with a brown powder.  Use a paintbrush and the Colorations sprays to paint the areas of the design within the embossed lines.
Die cut a frame from WorldWin's Kromekote copper and emboss.
Rub some Art Anthology Velvet paint in Lagoon over the copper frame to give it an oxidized appearance.

Die cut flowers and shape them on a foam mat.

Add a little Art Anthology Sorbet (Dazzle) on the flower petals to give a little glittery effect.

Spray a little bit of the Vineyard Colorations on your work mat, and dip the tips of the petals in this.

Stamp the Elegant Fronds stamp on the DoubleMates (Berry Red) cardstock. Cut rolled flowers from the stamped paper.

Put the card together as shown.

Supplies

WorldWin Paper:
DoubleMates: Berry Red
Spellbinders
Imperial M-Bossabilites
Blooms Four
Rose Creations
Grand Large Labels
JustRite Stamps: 
Art Anthology:
Zva Creative
May Arts Ribbon
Words or Whatever
Mask
Xyron
Tsukineko
Memento: Tuxedo Black; Versamark Watermark Ink
Clearsnap
Brown Embossing Powder