For some of you it may seem that fall is almost over. I would venture a guess that some of you have already had your first snowfall. However, I live in southern California, just north of San Diego, where fall looks a lot like...summer...with cooler nights.
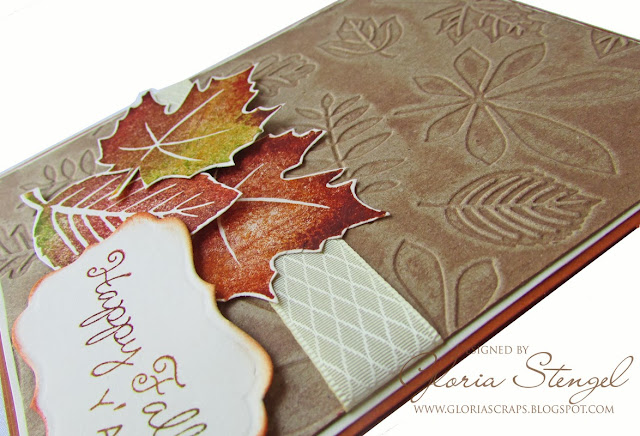
I love fall colors and decorate my house with items that say "FALL"! I also love to make fall-themed cards and projects. For this card I used Kraft cardstock and the Endless folder from the Couture Creations All Occasions set to create "leaf fossils"!
First, I rubbed the embossing folder with ink, on the side of the folder WITHOUT the Couture Creations logo. Then, I embossed the kraft cardstock. Since I am using the "debossed" side of the cardstock, the ink that was pressed into the paper makes the leaves look like "fossils." The raised parts of the design are not inked.
I used the Couture Creations Nested Victorian Rectangle to cut out my sentiment. I stamped
into different colors if ink and stamped. Easy! I used the same technique for the fall leaves. I
stamped the leaves, and then fussy cut them from the Light Totally Tan cardstock.
The pretty Deep Terra-Cotta cardstock is perfect for my card base. I goes well with the ink
colors I chose. This is a very simple card, with a big impact!
Here is the same embossing folder, with a different technique.
I created a faux patina effect for this card. It is a fun way to get more use out of your folders!
I created a card from Deep Terra Cotta cardstock and a mat from Deep Spring Green.
I used a brayer to add ink to the embossing folder. I used a selection of fall colors of dye ink.
Make sure you add ink to the inside of the folder, this time ink the section containing the
black Couture Creations logo. We are using the "embossed" side of the paper. Once again,
the background will receive the ink.
Place Light Totally Tan cardstock into the folder and emboss. (Wash your folder to prevent
staining.) Use a heat tool to make sure the ink on the cardstock is totally dry.
Create a "patina" by using a foam or sponge ink applicator to ink over the raised areas of the
embossed paper with green, blue, and dark brown ink, in that order. Allow to dry. You may
use a heat tool to dry the ink if you wish.
Ink some of the raised areas with Watermark or clear embossing ink. You only want to heat
emboss a few areas to create a "rusted" look on your card. Emboss with metallic embossing
powder. I created my own "rust" powder by combining several powders together in a small
jar.
Trim the paper to size and use it to create a card.
I used Light Totally Tan for the sentiment and for the inside of the card. The scallop mat is
made from Deep Spring Green.
Thanks for joining me today!
WorldWin Papers products:
Kraft Cardstock
Original ColorMates Light Totally Tan, Deep Terra-Cotta, Deep Spring Green
Other products:
Ink: Tsukineko Kaleidacolor Autumn Leaves, Cappuccino Delight; Tsukineko Memento
Rich Cocoa; Clearsnap Colorbox Chalk Creamy Brown; Clearsnap Colorbox Graphic 45
Decades Antique Moss, Bon Voyage, Dark Cashmere; Clearsnap Top Boss Watermark
Embossing powder: malachite, gold (Hampton Art), vintage photo (Ranger), copper
metallic (Cosmic Shimmer)
Ribbon: Really Reasonable Ribbon
Stamps: Close to My Heart (leaves); Taylored Expressions, Our Daily Bread Designs
Embossing folder: Couture Creations Endless
Die templates: Couture Creations Nesting Dies Victorian Rectangles, Rectangles, Scallop Rectangles
Adhesive: Couture Creations Foam Mounting Tape, Double-sided tape
Tools: Couture Creations Craft scissors, Craft mat, Handheld Essentials Tools


Oh what gorgeous cards and wonderful techniques, Gloria!! Thanks for sharing! ~ Blessings
ReplyDeletegorgeous
ReplyDeleteOk, now I need to try this! LOVE both the looks and I am not sure which is my favorite! I cannot pick!
ReplyDelete