Friday, May 9, 2014

Happy Mother's Day!

I want to wish all the moms out there a very Happy Mother's Day! I made a pretty card for all of you!


1. Trim Elan Metallics Candied Violet cardstock to create a 5 1/2 x 4 1/4 inch card.

2. Using a die cut template, cut the dotted "overlay" from Petallics Ice cardstock. Trim to fit card front. Attach the dotted overlay with foam tape for extra dimension.


3. Using a selection of die cut templates, cut flower and leaf shapes from Twist cardstock. The sample uses Twist Lime, Lilac, and Yellow.


4. Ink the shapes as desired and form into a flower cluster. The Twist cardstock is smooth on one side and mulberry paper on the other. You are able to create amazing paper flowers! 


5. Use Natural Smooth cardstock to trim out a small tag. Stamp the sentiment with gray ink. Attach the mini tag to the right side of the flower cluster with foam tape.


6. Trim Natural Smooth cardstock to fit the inside of the card. Stamp the sentiment with gray ink. Attach the panel to the inside of the card.


Thanks for looking!

~ Gloria (Scraps of Life)

Supplies used:

WorldWin Papers:
Twist Lilac, Yellow, Lime
ColorMates Smooth Natural
Elan Metallics Candied Violet
Petallics Ice

Ink: Stampin' Up Going Gray; Clearsnap Colorbox Pigment Violet, Lavender, Plum Berry, Thistle, Moss Green
Stamps: Stampin; Up; Hampton Art Ditto
Die cut templates: Spellbinders Foliage, Foliage Two, Carnation Creations, Jewel Flowers and Flourishes, Grand Peony Creations; Sweet n Sassy Stamps Mini Tags; My Favorite Things Polka Dot Cover-up, Gerbera Daisy; Memory Box Fabulous Phlox
Adhesive: Scotch 3M ATG tape; Scrapbook Adhesives by 3L 3D Foam Squares; Aleene's Tacky Glue

Friday, May 2, 2014

Mixed Media Flower Card Tutorial


Hi, it's Gini back with you again today! I wanted to create a mixed media/shabby card. Here's  how I created this.

1.  Begin with a 3.5" x 8" card base ( WorldWin ColorMates Beach)
2. Cut the next panel 3.25" x 7.75" ( WorldWin ColorMates White). Distress the edges by first using a distressing tool and then dipping the edges in a diluted mist spray.

3.  Cut a piece of WorldWin Translucent Vellum and a piece of the Beach cardstock 3" x 7.5".  Tape a Dreamweaver brass stencil over the vellum and apply modeling paste and allow to dry.
4.  Mount the vellum to the Bear cardstock by running the cardstock through the Xyron 5" Creative Station and applying the vellum to it (this is a great method to avoid seeing any adhesive on the vellum.
5.  Adhere crochet ribbon around the center of the panel.
6.  Lightly mist the entire card with a 2-toned pink mist.
7.  Apply the large Zva Creative Flourish ( CRB-06CA-106) to the card.

8.  Die cut multiple layers of the  Tattered Blossoms (Heartfelt Creations) using WorldWin's Petallics ( Coral Pink).  Shape the flower and attach to the card.  Add punched leaves to finish.

Tuesday, April 29, 2014

Rain, Rain, Go Away!

The card that I am sharing today is pretty simple, but I used a watercolor technique that I thought would be fun to show you.


1. Cut ColorMates Smooth Black cardstock to make a 5 x 5-inch card. 


2. Tape a plastic stencil to a piece of ColorMates Smooth White cardstock. Using pearlescent watercolor paints, paint a thin layer of color over the stencil. (I ended up using a foam brush to get the coverage I wanted.)


3. Remove the stencil and wipe it clean. Use a heat tool to dry the paper. You now have a sheet of polka dot background paper!

4. Trim the polka dot paper to slightly smaller than the card front and wrap with ribbon. Attach to the card.


4. Use die cut templates to create the banner and umbrella. I used Elan Metallics Spectral Blue, and Petallics Sky Pilot and Black Ore cardstock. Attach the banner and umbrella as shown.


5. Stamp sentiment onto ColorMates Smooth Black cardstock with white ink. Emboss with white embossing powder. 

6. Cut out the sentiment with a label die cut template. While the paper is still in the template, trace around the inside edge with a white pen.

7. Attach the sentiment to the card with foam tape.

8. Tie a bow with ribbon and add it to the card. Top with a button and some twine.


9. Use black dye ink to stamp a sentiment onto ColorMates Smooth White cardstock.

10. Repeat the watercolor technique on the right edge of the paper. Add another die cut umbrella as shown. Attach the paper to the inside of the card.

The shimmer of the Elan Metallics and Petallics cardstock looks amazing with the sparkle of the pearlescent watercolor! 

Thanks for looking!

~ Gloria (Scraps of Life)

Supplies used:

WorldWin Papers:
ColorMates Smooth Black, White
Elan Metallics Spectral Blue
Petallics Sky Pilot, Black Ore

Ink: Tsukineko Memento Tuxedo Black; Stampin' Up Whisper White
Watercolors: Yasutomo Pearlescent Watercolors
Stencil: The Crafter's Workshop Mini Swiss Dot
Pen: Sakura Gelly Roll White
Stamps: My Favorite Things Blue Skies Ahead; Our Daily Bread Designs Mini Tags 1
Die cut templates: Spellbinders Labels Twenty-five; My Favorite Things Umbrella; Papertrey Ink Banners
Flower punch: Stampin' Up
Twine and Ribbon: Really Reasonable Ribbon
Button: unknown
Adhesive: Scotch 3M ATG tape; Scrapbook Adhesives by 3L 3D Foam Squares; Aleene's Tacky Glue

Thursday, April 24, 2014

Building Block Card Tutorial

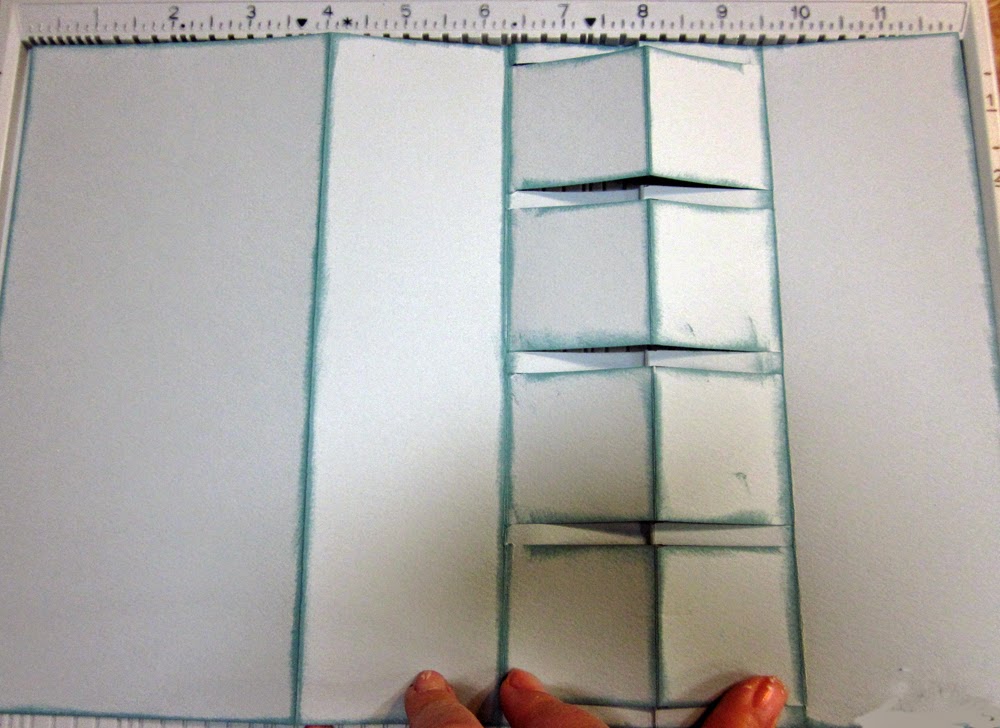
It's always fun to try different fancy fold cards - and I had not ever tried this one...  I have adapted a tutorial for a Building Block Card and changed the dimensions to accommodate the size of my  stenciled letters.  My version makes a tall and skinny card.


1.  Cut a piece of cardstock 8 1/4" x 12".  With the long side against the top of the scoring board, score at 4" (mountain fold) and 8" (valley fold).


2.  Pull the valley fold up like a mountain fold, and cut 1 3/4" in at the following intervals:
       1/4"
      2"
      2 1/4"
      4"
      4 1/4"
      6"
      6 1/4"
      8"
      8 1/4"


3.  Add a score line to the ends of each of the wide blocks ( at the 6 1/4" and 9 1/2") and fold as shown.  Ink the edges of all of the folds.


4.    Use a spatula to spread the Teresa Collins Basically Essential Modeling Paste over the letters from the Basically Essential Stencil to spell your sentiment.   Allow to dry and cut out the letters.
 5.  Decorate the panels with patterned paper.  Use the Xyron 5" Creative Station to apply adhesive to the panels.
Hint:  If you accidentally get adhesive in the wrong place, use the Xyron Adhesive Eraser Cube to remove the boo boo.

 6.  Cut letters from the patterned paper, ink the edges and apply adhesive using the Xyron Mini Sticker Maker.
 7.  Add ribbon to the card using the Xyron 1/4" Double Sided High Tack Tape.

 8.  Die cut flowers - cut two of the largest flowers from WorldWin's CutMates Spring Water paper.  Cut the next two sizes using the WorldWin Translucent Vellum White Plaid.  Ink the edges and shape.  Add a Zva Creative Mini rose to the center of the flower. Assemble  using the Xyron/Teresa Collins Clear Hold Adhesive. 


9.  Cut panels for the back of the card (for a place to write your message) using WorldWin Beargrass Petallics Cardstock.  Ink the edges and adhere using the Xryon 5" Creative Station.


10.  Finish assembling the card as shown.


Xyron 5" Creative Station
Xyron/Teresa Collins Adhesive Kit
(Products from this kit that were used were -Foam Squares, Adhesive Eraser Cube, 1" Sticker Maker, High Tack Double Sided Tape, Clear Hold Adhesive)
CTMH Ink

Tuesday, April 22, 2014

Artist Trading Blocks - WorldWin Style!

Artist Trading Blocks are all the rage these days. If you have not heard of this art form, here is a Pinterest Link to get you started! Some of the blocks are made of wood, but many are made from cardstock using some sort of template. I created my "block" using WorldWin Cardstock and the We R Memory Keepers Gift Box Punch Board! 


I selected the Elan Metallics Candied Violet cardstock for the lovely color, but more importantly, for the heavy weight of the cardstock. I needed something that would be easy to work with, but that would also be very sturdy. The cardstock is 111 pound cover and worked perfectly for the project.


1. The finished box is 4 x 4 x 4 inches, which means you need one 12 x 12-inch sheet of cardstock to create the box. Follow the directions on the punch board to score and fold the box. Use a strong adhesive to assemble the box. Since my box is for display only, I glued the top flap closed. (You can make boxes in sizes from 1 3/4 x 1 3/4 x 1 3/4 inches to 4 x 4 x 4 inches. (If you have access to paper larger than 12 x 12-inches, I am sure you can figure out how to make larger boxes!)


2. Trim 6 pieces of printed paper to 3 3/4 x 3 3/4-inches and attach to the sides, bottom, and the top of the box. (If you want to use the box as a gift box, you will NOT cover the top and you would need to be aware of how the closure works before gluing any decor to the top of the box.)


3. To create the flowers, I cut various flower shapes from Elan Metallics Candied Violet and Petallics Ice cardstock. I also cut leaves from Elan Metallics Moss cardstock. I used a variety of die cut templates to cut the flowers (see the supply list below).


4. Lightly spray all the flower and leaf die cut shapes with water. Crumple the flowers and leaves and allow to air dry. Since I am using such heavy weight cardstock, I needed the moisture to break down the fibers of the paper, allowing me to work with it easier. (You could also spray the flowers with a colored mist, rather than plain water.)


5. Trim out two doily shapes from the Candied Violet and Ice cardstock and ink with distress inks. (If you do not have access to a doily-shaped die cut template, you could use paper doilies, purchased from a craft store.) 

6. Using foam tape, attach the doilies to the top of the box as shown.

7. After the paper flowers and leaves are dry, gently unfold each item. Ink the flowers and leaves with distress ink as desired, and then shape them with a stylus and a foam mat or with your fingers.


8. Glue each layer together to form flowers. My flowers resemble carnations or dahlias. Arrange the flowers and leaves onto the top of the box and glue in place. You may choose to add a chipboard tag or other element to the box, as desired.


9. Cut several 1 1/2-inch wide strips of Petallics Ice cardstock and wrap them around the box to form a "belly band." Trim excess cardstock and glue the seams securely.

10. Cut several 3/4-inch wide strips of printed paper and wrap them around the cardstock band as shown.


11. Add more flowers and leaves to the front and sides of the box, as desired. (I used flowers to hide the seam on the side of the box.) The Elan Metallics and Petallics cardstock is very shimmery, adding an elegant touch to the project.


12. Place your box on your desk or table and enjoy!

Thanks for looking!


~ Gloria (Scraps of Life)

Supplies used:

WorldWin Papers:
Elan Metallics Candied Violet, Moss
Petallics Ice

Designer Paper: Graphic 45 Secret Garden Sun Kissed
Chipboard tag: Graphic 45 Secret Garden
Ink: Ranger Distress Dusty Concord, Shaded Lilac
Die cut templates: Spellbinders Jewel Flowers and Flourishes, Carnation Creations, Foliage, Lotus Pendant
Tools: We R Memory Keepers Gift Box Punch Board
Adhesive: Scotch 3M ATG tape; Scrapbook Adhesives by 3L 3D Foam Squares; Aleene's Tacky Glue; Scor-tape

Thursday, March 27, 2014

For the Boys

Masculine cards normally very difficult to create. Most of the "bits and bobs" that are available for paper crafting have a more feminine flair (flowers, ribbon, gems, pearls). However, you can create striking masculine cards with a bit of cardstock and some stamps!


1. Cut ColorMates Smooth and Silky Cocoa cardstock to 11 x 4 1/4 inches. Score at 5 1/2 inches and make into a top-fold card.

2. Trim Kraft cardstock to 5 3/8 x 4 1/8 inches. Using dark brown ink, stamp a wood grain image onto the kraft cardstock. Attach the wood grain panel to the card front.

3. Use a die cut template to trim a sentiment strip from Original ColorMates Light Totally Tan cardstock  (or trim a 1/2 x 3 inch strip of cardstock). Stamp the sentiment onto the cardstock strip with dark brown ink.

4. Attach brads to the ends of the cardstock strip as shown. Attach the strip to the bottom of the card front. Use foam tape for extra dimension.


5. Using glue, attach a length of twine to the left center of the card.

6. Cut an inverted scallop circle from  ColorMates Smooth and Silky Cocoa cardstock. Attach the circle to the card with foam tape, overlapping the twine.

7. Using dark brown ink, stamp the main image onto Original ColorMates Light Totally Tan cardstock. Die cut the image with a circle template. Lightly sponge vintage photo ink around the image as shown.

8. Attach the image to the inverted scallop circle with foam tape.


9. Using strong glue, attach three metal gears to the upper right corner of the card as shown.

10. Trim Original ColorMates Light Totally Tan cardstock to 5 3/8 x 4 1/8 inches and line the inside of the card.

Thanks for looking!

~ Gloria (Scraps of Life)

Supplies used:

WorldWin Papers:
ColorMates Smooth and Silky Cocoa
Original ColorMates Light Totally Tan
Kraft

Ink: Tsukineko Memento Rich Cocoa; Ranger Distress Vintage Photo
Stamps: My Favorite Things Wood Plank Background; Stampin' Up Harvest Blessings; Hero Arts Everyday Sayings
Die cut templates: Spellbinders Standard Circles Large, Large Classic Inverted Scallop Circles; My Favorite Things Sentiment Strips
Twine: May Arts
Gears: Tim Holtz Idea-ology; 7 Gypsies
Brads: unknown
Adhesive: Scotch 3M ATG tape; Scrapbook Adhesives by 3L 3D Foam Squares; Aleene's Tacky Glue; Beacon Fabri-Tac

Wednesday, March 12, 2014

You Are My Sunshine with WorldWin Papers

I wanted to post a sunshine layout, since winter has been so brutal here lately!  It's Katrina and I am sharing a layout filled with various WorldWin paper collections.  They all blend so seamlessly together, it makes them a breeze to work with.

My background paper is Colormates in Sapphire Blue.  It works perfectly to offset Sheldon's blue eye!

I used three different papers in this cluster.  The sun is from Colormates Cascata in Yellow.  The cloud is Twist in White.  And then the word "sunshine" was cut from Colormates in Deep Meri-Gold.  I used the Twist on the cloud, since it has a little texture to it. 

Here I used Petallics in Ice to offset my pictures and the die cut.  There is a sheen to it that makes everything pop. 

Thanks for stopping by today.  That's all I have for you, but be sure to check out everyone else's work on the blog!!

Katrina Hunt
Paper, Scissors and Glue

Supplies:
WorldWin Papers
Colormates-Sapphire Blue
Petallics-Ice
Twist-White
Colormates Cascata-Yellow
Colormates-Deep Meri-Gold

Other Supplies
Adhesive-ThermOWeb

Pattern Paper & Stickers-Echo Park Country Drive